 Tweet
Tweet
I recently toured a haunted house to get some new ideas for one we are doing. There was a wall that we had to push through to get out. It felt like blow-up yard art pressed together. The walls were made out of some sort of nylon and filled with air. It was very hard to figure out how to go through, but the wall gave enough to pass easily. How was this done?
-
-
-
The prop/effect is actually quite easy to make yourself if you are so inclined. We bought ours because our designer decided he wanted them, rather than checking to see if it could be made in house, which it can, quite easily. Anyhow...
The prop can be made with little money and time.
What you'll need;- Multiple yards of rip-stop nylon fabric, depending on how big you want to make it (any fabric store will have this)
- 8 ft of 1" wide nylon webbing/strap for every foot of wall that you want to cover. IE, if you want to make you're so that it is 7' tall by 12' long (19 feet), you will need 152ft of webbing. (this formula is inclusive of both sides of the wall).
- Grommet kit (sporting goods store, some fabric shops have these as well)
- Sewing machine
- (2) High volume floor blowers, such as this one from Lowes. Alternately, you can typically find, quite inexpensively, large squirrel cage blowers out of used home heaters. Call your local HVAC company, chances are they have a number of used ones laying around that they'll sell cheap, if not give away. (After all, those floor blowers are nothing more than a squirrel cage fan in a fancy plastic housing with a handle).
Construction is pretty simple, you're basically sewing together a 5 sided box out of the nylon fabric. The main "face" of the box will obviously need to be the size that you want the wall. So if you want a hall that is 7' x 16' long, you'll need to sew together a 7x16' panel of fabric. The top and bottom need a piece of fabric that is 18" x 16'. The side panels would need to be 18" x 7'. Once you have the 5 panels done, sew the 5 panels together making a 5 sided box.
At that point, use your 1" nylon webbing and sew it to the "back" edges of the box, front and back of the fabric. You're creating a sandwich of the panel fabric in between the nylon webbing.
You're almost done. Pop in a grommet ever 16" on all 4 edges that you have created. Do all of the above again to create the second box.
Installation is quite simple, but keep in mind you need at least a foot and a half on the BACK of the wall, each side. I suppose you could mount them on top of the wall if you got creative with cutting. Find a place that you want to mount the blowers on the back of the wall and cut an opening for the blower snout to stick through to the other side. Secure the blower so it doesn't come crashing down on a staff or actor's head. Rinse and repeat for opposite wall.
Finally, mount the air bags to the walls. We used some small fender washers and drywall screws. The air now blows into the back of your 5 sided box, inflating the bags.
Our walls were positioned so that the 2 bags touch when they are inflated.
As I said a neat effect that is quite easy to make. Time consuming? Maybe, can your girlfriend/wife sew? But I know many of us have way more time than money.
Comment
- Multiple yards of rip-stop nylon fabric, depending on how big you want to make it (any fabric store will have this)
-
"Sewing?" I quit sewing, I Goop Glue everything together, quicker and no sore fingers, just ventillate the work space well.Comment
-
Thanks
Thanks for the input. Since we are a small church youth group, we have to save every penny; therefore, we can't buy the prop. We're going to use the idea on how to make it for next year.Comment
-
Does anyone have a drawing of how this works and what it looks like? Seems like a really good effect. I read the previous post with the instructions, but I am still a little fuzzy.Comment
-
We just made ours today. Took about an hour to complete. Ours is approx. 15 ft long, and completely black. Very un-nerving. Turned out great.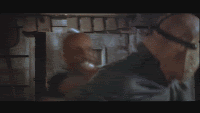
Comment
-
Any pictures?Comment
-
I didn't have my camera with me today. The other workers took pictures and I dont know when i'll get a copy of them.Comment
-
I'll get some shots of ours up. It might be a day or three though.Comment
-
And three days later.. Here are the pics I've promised.
http://hauntworld.com/haunted_house_...0&postcount=38
It doesn't give any real dimensions because the concept is pretty simple. Like I said, you're building a 5 sided box. The only "rule" is I wouldn't make the bags any shallower than 18". You want lots of space to really engulf your body.Comment
Comment